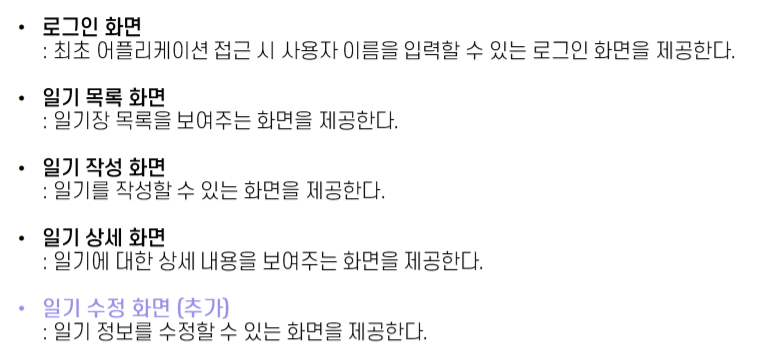
Vue로 만든 다이어리입니다. 요구사항은 다음과 같습니다.




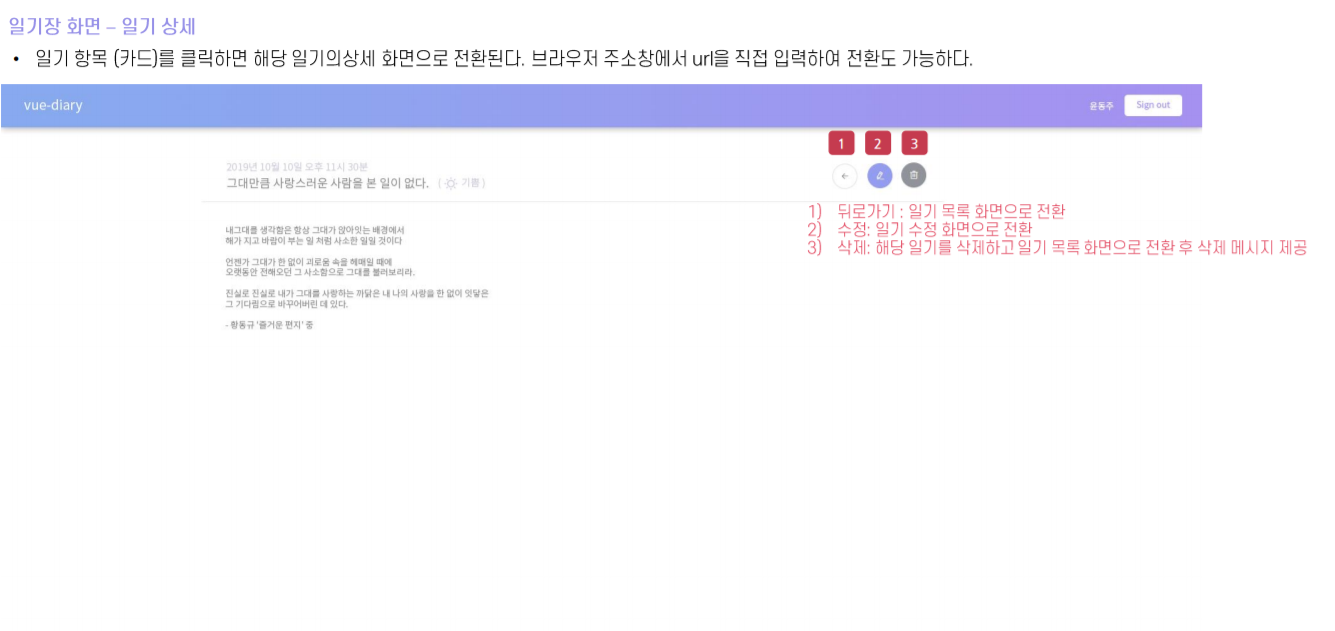
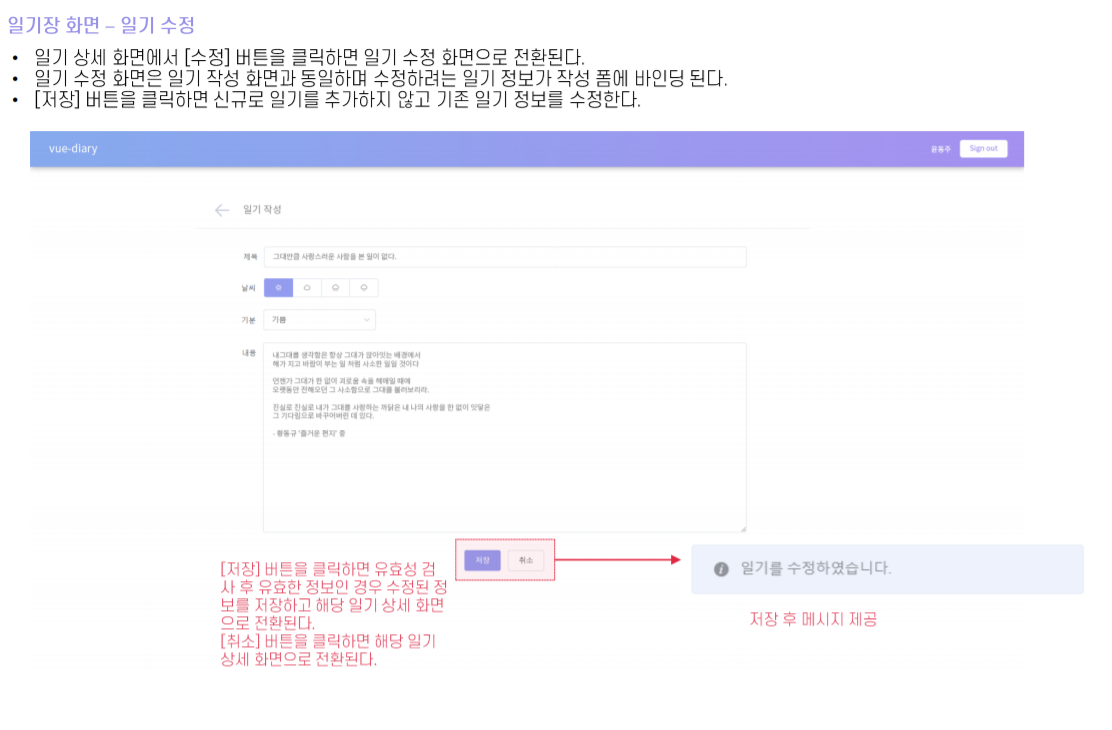
일단 Vue webpack을 생성합니다.
CMD 에서 빈 디렉토리로 이동 후 vue init webpack-simple를 통해 webpack을 생성합니다.
이후 폴더의 구조는 아래와 같습니다.
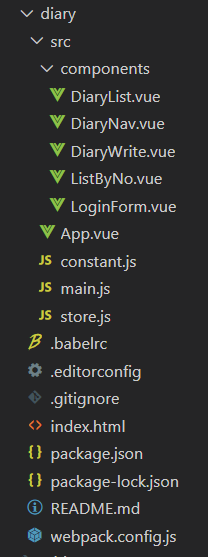

처음에 package.json에는 위와 같이 생성되어 있는데 해당 프로젝트에서는 vuex와 vue-router, element-ui가 필요하므로 install하여 설치 해 준다.
npm을 기준으로
npm install vuex --save
npm install vue-router --save
npm install element-ui -S
다음과 같이 설치해준다.
그럼 이후에 "dependencies" 부분에 보면 다음과 같이 vuex,vue-router,element-ui가 설치된걸 알 수 있다.
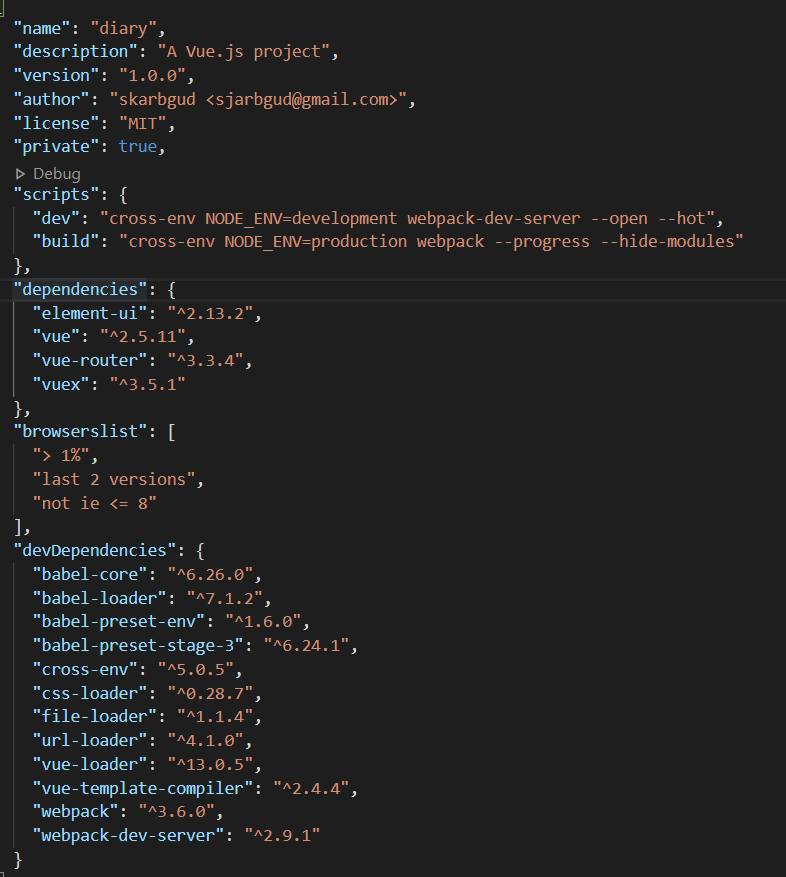
이후 vue파일들과 js파일들을 작성해주면 된다.
import Vue from 'vue'
import App from './App.vue'
import VueRouter from 'vue-router';
import { store } from './store';
import LoginForm from './components/LoginForm';
import DiaryNav from './components/DiaryNav'
import DiaryWrite from './components/DiaryWrite';
import DiaryList from './components/DiaryList';
import ListByNo from './components/ListByNo';

import ElementUI from 'element-ui'
import 'element-ui/lib/theme-chalk/index.css'   //npm install url-loader --save-dev을 통해서 url-loader 설치
import locale from 'element-ui/lib/locale/lang/ko'

Vue.use(ElementUI, { locale })
Vue.use(VueRouter);

const router = new VueRouter({
    routes: [
        { path: '/', redirect: '/login' },
        { path: '/login', component: LoginForm },
        {
            path: '/diary',
            component: DiaryNav,
            children: [
                { path: '/', component: DiaryList },
                { path: 'write/:no?', component: DiaryWrite},    //no파라미터로 수정 게시글 번호 받음
                { path: ':no', component: ListByNo, props:true }
            ]
        }
    ]
})

new Vue({
    el: '#app',
    store: store,
    render: h => h(App),
    router
})
main.js
컴포넌트들을 선언 후 각 routes path에 맞게 사용해준다.
import Vue from "vue";
import Vuex from "vuex";
import Constant from "./constant";

Vue.use(Vuex);

//vuex
export const store = new Vuex.Store({
  state: { //저장하는 값들
    name: '윤동주', //사용자이름
    no: 0, //인덱스
    list: [] //목록리스트
  },
  mutations: {
    [Constant.CLEAR_LIST]: (state) => {
      state.list = [];
    },
    [Constant.DELETE_DIARY]: (state, payload) => {  //다이어리글 삭제
      state.list.splice(payload.index, 1); //payload.index -> 지울려고하는 인덱스 값
    },
    [Constant.REVISE_DIARY]: (state, payload) => { //다이어리 글 수정
      state.list[payload.list.no] = payload.list; //payload.no 값으로 인덱스 지정 후 payload의 리스트로 저장
    }
  }
});
store.js
다이어리 목록들의 내용과 사용자의 이름을 담을 수 있는 vuex를 사용할 store.js를 만들어준다.
export default{
    CLEAR_LIST : "clearList",
    DELETE_DIARY : "deleteDiary",
    REVISE_DIARY : "reviseDiary"
}
constant.js
store에 있는 상태를 변경하는 작업(mutation)과 action을 constant.js에 등록한다.
<template>
  <div id="app">
    <router-view></router-view>
  </div>
</template>

<script>
export default {
  name: 'app',
  data () {
    return {
    }
  }
}
</script>

<style>
html, body {padding: 0; margin: 0; height: 100%; width: 100%; overflow: hidden;}
#app{height: 100%;width: 100%;}
</style>
App.vue
첫 화면이 렌더링 되는 템플릿이 저장되어 있는 App.vue이다.

<template>
<div class="form">
  <el-row class="center">
    <el-row>
      <el-col>
        <span>vue-diary</span>
      </el-col>
    </el-row>

    <el-row>
     <el-input label="사용자" placeholder="사용자 이름" v-model="name" v-on:keyup.enter.native="login()"></el-input>
    </el-row>

    <el-row>   <!--로그인 버튼-->
      <el-button type="info" size="medium"  @click="login" class="button-style">Sign In</el-button>
    </el-row>

  </el-row>
</div>
</template>

<script>
export default {
  name: "LoginForm",
  data() {
    return {
      name: ''
    };
  },
  methods: {
    login() {     //로그인버튼
      let router = this.$router;
      if (this.name != '' && this.name == this.$store.state.name) {   //입력한 값이 있고, store의 name의 값과 일치하면 /diary path로
        router.push('/diary');
        this.$store.state.name = this.name;

        this.$message({
          type:'info',
          message: `${this.name}님 반갑습니다.`
        });
      }
    }
  }
}
</script>

<style scoped>
  .form{
    width: 100%;
    height: 100%;
    display: flex;
    justify-content: center;
    align-items: center;
    color: #9C97F0;
    background-color:#9C97F0;
    }
  .center{
    justify-content: center;
    align-items: center;
    background-color:white;
    padding: 10px 60px 10px 60px;
    text-align:center;
  }
  .el-row{
    margin: 10px;
  }
  .button-style{
    width: 300px;
    background-color:#9C97F0;
  }
</style>
LoginForm.vue
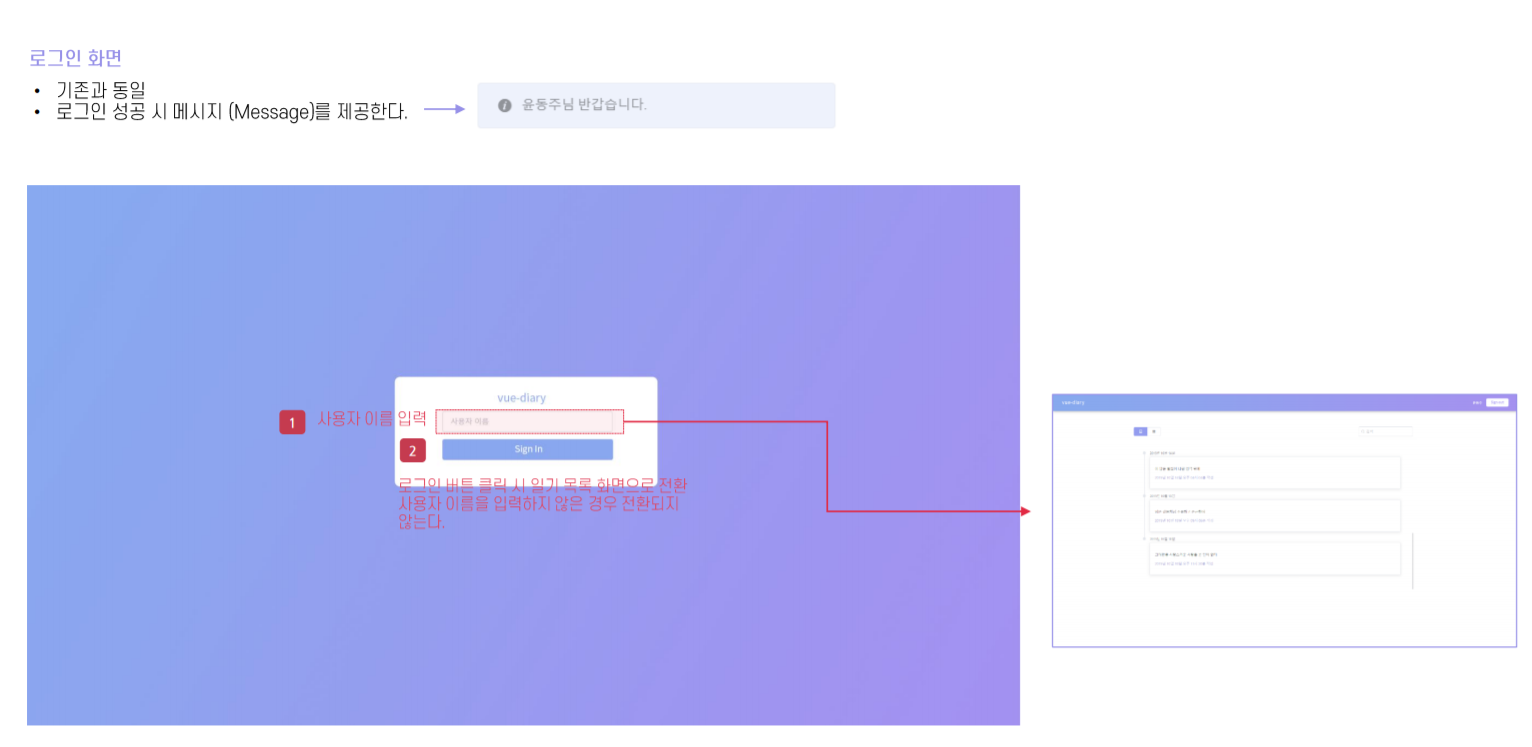
위와 같이 / -> /login으로 path를 지정하였기 때문에 /login에 지정한 LoginForm.vue가
router-view를 통해서 화면에 나타나게 된다.
store.js에서 미리 지정해 둔 사용자의 name과 같게 된다면 다음 화면인 다이어리의 목록으로 route.push하게 되어 /diary의 path로 이동하게 된다.
/diary의 path는 DiaryNav.vue로 컴포넌트를 지정하였다.
상단의 메뉴를 고정으로 목록, 작성, 상세보기, 수정들이 네스티드 라우터(Nested Router)구조를 가지고 있기 때문이다.
네스티드 라우터란 네스티드라는 말 자체 그대로 둥지를 짓다,중첩이라는 의미를 가지고 있기에
하나의 상위 컴포넌트 1개에 하위 컴포넌트 1개를 포함하는 구조를 가진 구조를 뜻한다.
<template>
<el-row type="flex" justify="center" class="list-main">
  <el-col :span="16">
    <!--리스트형,카드형,작성 검색 영역  -->
    <el-row>
        <!-- 작성(Write)로 이동 -->
        <el-col :span="19">
          <!-- (타임라인,카드) 토글 -->
          <el-radio-group v-model="radio" class="radio-group">
            <el-radio-button size="small" label="list"><i class="el-icon-tickets"></i></el-radio-button>
            <el-radio-button size="small" label="card"><i class="el-icon-menu"></i></el-radio-button>
          </el-radio-group>

          <!-- 작성 버튼 -->
          <el-button size="small" class="el-icon-edit" @click="write" circle></el-button>
        </el-col>

        <!-- 검색 부분 -->
        <el-col :span="5">
          <!-- 검색(input) -->
          <el-input v-model="search" placeholder="검색" prefix-icon="el-icon-search "
          size="small" v-on:keyup.enter.native="submit(search)">
            <!-- 클리어 아이콘 -->
            <i slot="suffix" class="el-input__icon el-icon-circle-close el-input__clear"
              @click="reset" v-if="search !== ''"></i>
          </el-input>
        </el-col>
        <!-- /검색 부분 끝 -->
    </el-row>
    <!--/라디오 버튼(토글), 작성, 검색 영역 끝 -->

    <el-divider></el-divider><!--구분선-->

    <!-- 타임라인 형태 시작 -->
    <el-row v-show="radio==='list'">
      <!-- 다이어리 목록 출력 부분 -->
      <div class="scroll-box">
        <el-timeline class="scroll">
          <el-timeline-item :timestamp="getDateTime(index)" placement="top" v-for="(list,index) in lists" :key="index">
            <el-card @click.native="detail(index)">
              <div>
                <!-- 타임라인 제목 -->
                <h4>{{list.title}}</h4>
                <!-- 타임라인 카드 날짜 년 월 일 시 분 -->
                <p class="card-date">
                  {{getCardDate(index)}}
                </p>
              </div>
            </el-card>
          </el-timeline-item>
        </el-timeline>
      </div>
      <!-- /다이어리 목록 출력 부분 -->
    </el-row>
    <!-- 타임라인 형태 끝 -->

    <!-- 카드 형태 시작 -->
    <el-row v-show="radio==='card'" class="scroll-box">
      <!-- 다이어리 목록 출력 부분 -->
      <el-row class="scroll" :gutter="12">
        <el-col :xs="8" :sm="8" :md="8" :lg="8" :xl="8" :span="8" v-for="(list,index) in lists" :key="index">
          <!-- 카드영역 -->
          <div @click="detail(index)" class="card">
            <el-card shadow="hover">
              <div class="card-date">
                {{getDateTime(index)}}
                <span><i @click.stop="remove(index)" class="el-icon-error"></i></span>
              </div>
              <div class="card-title">{{list.title}}</div>
              <div class="card-content">{{list.content}}</div>
            </el-card>
          </div>
          <!-- 카드영역 끝 -->
        </el-col>
      </el-row>
    </el-row>
    <!-- 카드 형태 끝 -->

  </el-col>
</el-row>
</template>

<script>
import Constant from '../constant'
export default {
  name: "DiaryList",
  data() {
    return {
      lists: this.$store.state.list,
      no: 0,
      search: '',
      radio: 'list',  //radio버튼
    };
  },
  created: function() {
    this.no = this.$store.state.list.no;
  },
  methods: {
    write() {   //작성 버튼
      let router = this.$router;
      router.push({
        path: '/diary/write'
      })
    },
    reset() { //검색 초기화 버튼(claerable)
      this.search = '';
      this.lists = this.$store.state.list;
    },
    submit(search) {  //검색 enter 메소드
      let newArr = this.$store.state.list.filter(it => it.title.includes(search)); //새 리스트를 만들어서 원래의 리스트의 제목과 입력받은(search)이 포함된것 리턴
      this.lists = newArr;  //연결된 리스트에 찾은 리스트를 넣는다.
    },
    remove(index) { //다이어리 목록의 리스트 항목을 제거
      this.$store.commit(Constant.DELETE_DIARY, {index: index});
      this.$message({
        type:'info',
        message: '삭제하였습니다.'
      });
    },
    detail(no) {    //목록의 자세히 보기 버튼
      let router = this.$router;
      router.push(`/diary/${no}`);
    },
    getDateTime(index){  //날짜 타임스탬프 사용 메소드
      let date = `${this.lists[index].date.getFullYear()}년 ${this.lists[index].date.getMonth()+1}월 ${this.lists[index].date.getDate()}일`;
      return date;
    },
    getCardDate(index){ //타임라인 년월일 시분초
      let date;
      let hours = this.lists[index].date.getHours();
      let minutes = this.lists[index].date.getMinutes();

      if(minutes < 10) {minutes = `0${minites}`;}
      if(hours > 12){
        hours = hours-12;
        if(hours < 10) {hours = `0${hours}`;}
        date = `${this.getDateTime(index)}
                오후 ${hours}시 ${minutes}분 작성`;
      }
      else{
        if(hours < 10) {hours = "0"+hours;}
        date = `${this.getDateTime(index)}
                오전 ${hours}시 ${minutes}분 작성`;
      }
      return date;
    }
  }
}
</script>

<style scoped>
  .list-main{
    margin-top: 2%;
  }
  .el-divider--horizontal{
    margin:10px 0px 40px 0px;
  }
  .el-icon-edit{
    background-color: #9C97F0;
    color:white;
  }
  .el-icon-edit:hover{
    color:black;
  }
  .radio-group{
    margin-right: 20px;
  }
  .card{
    margin-top: 5%;
  }
  .card-date{
    font-size: 13px;
    color:#9C97F0;
  }
  .card-title,.card-content{
    margin-top: 5%;
    font-size: 13px;
  }
  .card-content{
    color: gray;
  }
  .scroll-box{
    height:500px;
    overflow:overlay;
    overflow-x: hidden;
  }
  .scroll{
    overflow:auto;
    padding: 0 4% 0 3%;
  }
  .el-icon-error{
    float:right;
    color: gray;
  }
  .el-icon-error{
    visibility: hidden;
  }
  .el-card__body:hover .el-icon-error{
    visibility: visible;
  }
  .el-card:hover{
    background-color: #F6F7FD;
  }
</style>
DiaryList.vue
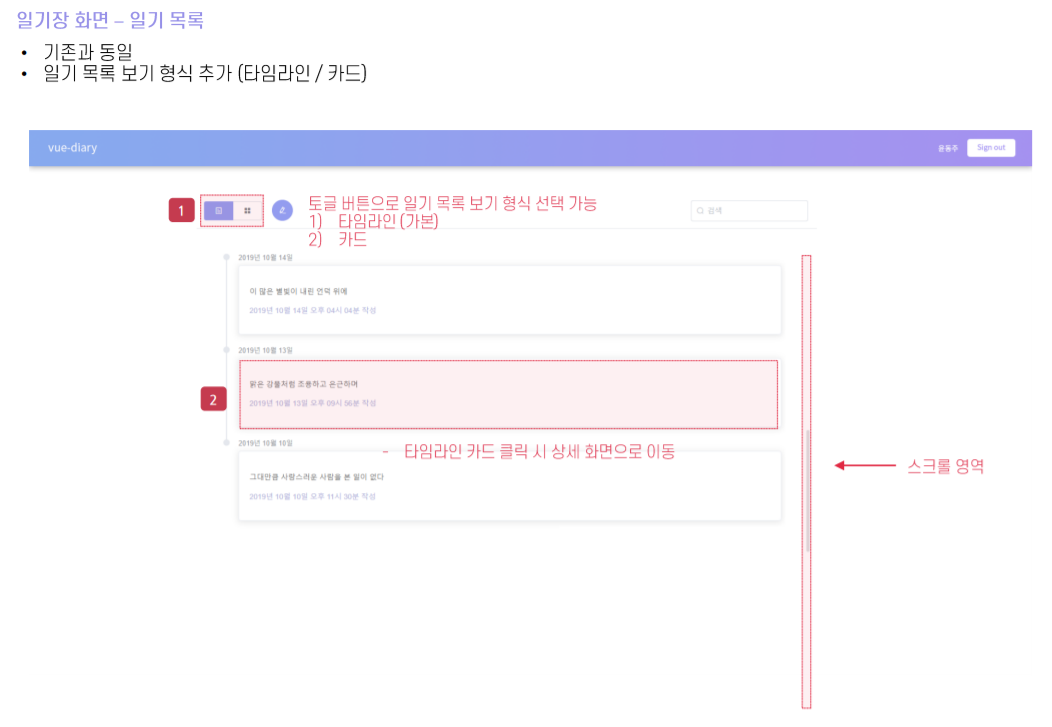
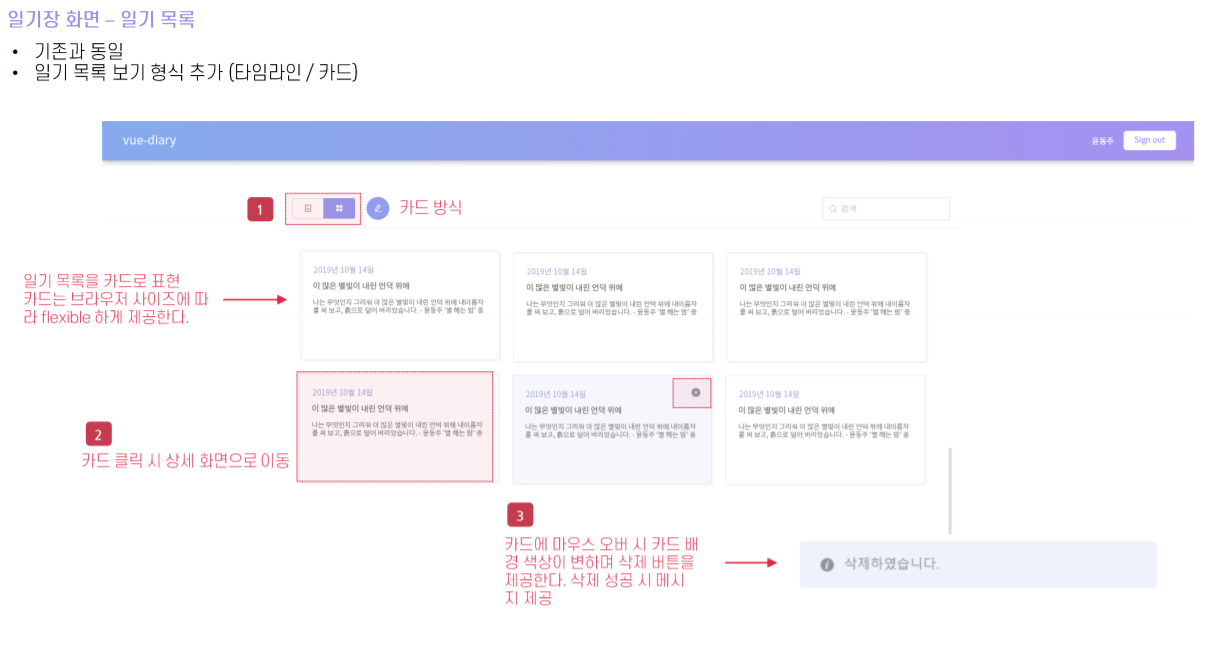
DiaryNav아래에 다이어리 리스트를 나타내는 자식 컴포넌트로 DiaryList.vue를 통해 다이어리의 리스트를 보여준다.
<template>
<el-row>
    <el-row class="content-top" type="flex" justify="center">
      <el-col :span="14">
        <!--날짜-->
        <el-row  class="date">
          {{getDate}}
        </el-row>

        <!-- 제목, 날씨, 기분 -->
        <el-row>
          <span>{{lists[no].title}}</span>
          <span class="weather-feel-icon">(<i :class="weather"></i> {{lists[no].feel}})</span>
        </el-row>
      </el-col>

      <!-- 아이콘 모음 -->
      <el-col :span="4" class="icon-area">
        <el-button icon="el-icon-back" circle @click="back()"></el-button>  <!-- 뒤로가기 버튼 -->
        <el-button class="el-icon-edit" circle @click="revise()"></el-button> <!-- 수정하기 버튼 -->
        <el-button type="info" icon="el-icon-delete" circle @click="remove()"></el-button> <!-- 삭제 버튼 -->
      </el-col>
    </el-row>

    <!-- 하단 내용 부분 -->
    <el-row>
      <el-row justify="center" type="flex">
        <el-col :span="18">
          <el-divider></el-divider> <!--경계선-->
        </el-col>
      </el-row>

      <el-row justify="center" type="flex" class="content">
        <el-col :span="17">
          {{lists[no].content}}
        </el-col>
      </el-row>

    </el-row>
    <!-- 하단 입력부 끝 -->
  </el-row>
</template>

<script>
import constant from '../constant';
export default {
  name: "ListByNo",
  data() {
    return {
      lists: this.$store.state.list,    //이 리스트의 값을 store의 리스트값으로 넣는다.
    };
  },
  computed:{
    getDate(){  //날짜는 계산된 채로 불러오기 때문에 계산된 값으로 computed에 넣어서 캐싱처리
      let dateDay;
      let yearMonthDay = `${this.lists[this.no].date.getFullYear()}년
                          ${this.lists[this.no].date.getMonth()+1}월
                          ${this.lists[this.no].date.getDate()}일`;
      let hours = this.lists[this.no].date.getHours();
      let minutes = this.lists[this.no].date.getMinutes();

      if(minutes < 10) {minutes = `0${minites}`;}

      if(hours > 12){
        hours = hours-12;
        if(hours < 10) {hours = `0${hours}`;}
        dateDay = `${yearMonthDay} 오후 ${hours}시 ${minutes}분`;
      }
      else{
        if(hours < 10) {hours = `0${hours}`;}
        dateDay = `${yearMonthDay} 오전 ${hours}시 ${minutes}분`;
      }
      return dateDay;
    },
    weather(){   //날씨 아이콘 클래스 바인딩하기 위해 사용
      return ('el-icon-'+this.lists[this.no].weather);
    }
  },
  props:['no'],
  methods: {
    back(){ //뒤로가기 버튼: 목록으로 전환
      let router = this.$router;
      router.push('/diary');
    },
    revise(){ //수정 버튼
      let router = this.$router;
      router.push(`/diary/write/${this.no}`);
    },
    remove() {  //삭제 버튼
      this.$store.commit(constant.DELETE_DIARY, {index: this.no});
      let router = this.$router;
      router.push('/diary');
      this.$message({
        type:'info',
        message: '일기를 삭제하였습니다.'
      });
    }
  }
}
</script>

<style scoped>
  .content-top{
    margin-top:2%;
    padding:0 40px 0 40px;
  }
  .date, .weather-feel-icon{
    color: gray;
  }
  .icon-area{
    text-align: right;
  }
  .el-icon-edit{
    background-color: #9C97F0;
    color: white;
  }
  .content{
    height: 500px;
    overflow-y: auto;
    overflow-x: auto;
    width: 100%;
  }
</style>
ListByNo.vue
다이어리의 상세 내용보기는 각 게시글의 no 번호를 props로 받아서 리스트에서 해당 글의 no 번호로 게시글의 상세 보기를 할 수 있게 하였다.
<template>
  <el-row type="flex" justify="center">
    <el-col>
      <!-- 상단 타이틀 -->
      <el-row class="content-top-margin" type="flex" justify="center">
        <el-col :span="1">
          <i class="el-icon-back" @click="cancel"></i>  <!--뒤로가기 아이콘-->
        </el-col>

        <el-col :span="16">
          <span>일기 작성</span>
        </el-col>
      </el-row>
      <!-- /상단 타이틀 끝-->

      <!-- 하단 입력부 -->
      <el-row type="flex" justify="center">
        <el-col :span="18">
          <el-divider></el-divider> <!--경계선-->

          <el-row>
            <el-col :span="24" class="content-area">

              <el-form :model="ruleForm" :rules="rules" ref="ruleForm"  label-width="120px" class="demo-ruleForm">
                <el-form-item label="제목" prop="title">    <!-- 제목 입력 -->
                  <el-input v-model="ruleForm.title"></el-input>
                </el-form-item>

                <el-form-item label="날씨" prop="weather">    <!-- 날씨 선택 -->
                  <el-radio-group v-model="ruleForm.weather">
                    <el-radio-button label="sunny"><i class="el-icon-sunny"></i></el-radio-button>
                    <el-radio-button label="cloudy"><i class="el-icon-cloudy"></i></el-radio-button>
                    <el-radio-button label="heavy-rain"><i class="el-icon-heavy-rain"></i></el-radio-button>
                    <el-radio-button label="light-rain"><i class="el-icon-light-rain"></i></el-radio-button>
                  </el-radio-group>
                </el-form-item>

                <el-form-item label="기분" prop="feel">   <!-- 기분 선택 -->
                  <el-select v-model="ruleForm.feel" placeholder="기분을 선택하세요">
                    <el-option label="기쁨" value="기쁨"></el-option>
                    <el-option label="우울" value="우울"></el-option>
                    <el-option label="화남" value="화남"></el-option>
                  </el-select>
                </el-form-item>

                <el-form-item label="내용" prop="content">  <!-- 내용 입력 -->
                  <el-input type="textarea" v-model="ruleForm.content" :rows="10"></el-input>
                </el-form-item>

                <el-form-item class="submit"> <!--버튼 가운데 정렬-->
                  <el-button type="primary" @click="save('ruleForm')">저장</el-button>  <!-- 저장 버튼 -->
                  <el-button @click="cancel">취소</el-button>   <!-- 취소 버튼(목록가기) -->
                </el-form-item>
              </el-form>
            </el-col>
          </el-row>
        </el-col>
      </el-row>
      <!-- 하단 입력부 끝 -->
    </el-col>
  </el-row>
</template>

<script>
import constant from '../constant';
export default {
  name: "DiaryWrite",
  data() {
    return {
      no: this.$route.params.no,  //라우터 파라미터 값을 받아온다.
      ruleForm:{
        title: '',
        content: '',
        weather: '',
        feel: ''
      },
      rules:{   //유효성 검사
        title:[
          {required: true, message: '제목을 입력해 주세요.', trigger: 'blur'}
        ],
        content:[
          {required: true, message: '내용을 입력해 주세요.', trigger: 'blur'}
        ],
        weather:[
          {required: true, message: '날씨를 선택해 주세요.', trigger: 'chagne'} //변경시 trigger 감지
        ],
        feel:[
          {required: true, message: '기분을 선택해 주세요.', trigger: 'change'} //변경시 trigger 감지
        ]
      }
    };
  },
  methods: {
    save(formName){   //폼 저장 버튼 클릭
      this.$refs[formName].validate((valid) => {
        if(valid){
          let date = new Date();
          let router = this.$router;
          if(this.no!=null){  //라우터 값이 있어서 no값이 null이 아니면
            let listItem ={
                          'no':this.no,
                          'title':this.ruleForm.title,
                          'content':this.ruleForm.content,
                          date,
                          'weather':this.ruleForm.weather,
                          'feel':this.ruleForm.feel
                          };
            this.$store.commit(constant.REVISE_DIARY, {list:listItem});
            this.$message({ //수정 메세지 출력
              type:'info',
              message: '일기를 수정하였습니다.'
            });
          }
          else{   //현재글이 수정이 아니라 처음 작성이라면
            this.$store.state.list.push({ //store의 리스트에 no,title,content,date,weather,feel를 넣는다
              'no': this.$store.state.no++, //no값을 처음에 0을 통해 넣고 ++을 통한 증감 연산자를 통해서 다음 값을 증가해서 다음 등록때에는 no값이 증가
              'title': this.ruleForm.title,
              'content': this.ruleForm.content,
              date,
              'weather':this.ruleForm.weather,
              'feel':this.ruleForm.feel
            });
            this.$message({ //작성 메세지 출력
              type:'info',
              message: '일기를 작성하였습니다.'
            });
          }
          router.push('/diary');
        }
        else{
          return false;
        }
      });
    },
    fetchData(){  //이미 작성한 글의 데이터를 data에 바인딩
      if(this.no != null){
        this.ruleForm.title = this.$store.state.list[this.no].title;
        this.ruleForm.content = this.$store.state.list[this.no].content;
        this.ruleForm.weather = this.$store.state.list[this.no].weather;
        this.ruleForm.feel = this.$store.state.list[this.no].feel;
      }
    },
    cancel() {    //취소버튼
      let router = this.$router;
      if(this.no != null){
        router.back();  //취소시에 리스트로 이동
      }
      else{
        router.push('/diary');  //취소시에 리스트로 이동
      }
    }
  },
  created(){
    //뷰가 생성되고 데이터가 이미 감시 되고 있을 때 데이터를 가져온다.
    this.fetchData()
  }
}
</script>

<style scoped>
  .content-top-margin{
    margin-top:2%;
  }
  .content-area{
    padding: 0 5% 0 0;
  }
  .submit {
    text-align: center;
  }
</style>
DiaryWrite.vue
다이어리 작성부분은 해당 글의 수정의 내용까지 함께 하여 재사용할 수 있게끔 하기 위해서 라우터의 params값을 통해 no값이 있다면 created 훅에서 fetchData라는 메소드를 실행 시켜 기존에 있는 리스트의 데이터 내용을 바인딩 할 수 있게 하였다.
최종 완성 소스코드 github 주소
https://github.com/skarbgud/vue-diary
GitHub - skarbgud/vue-diary: 📂Vue Diary
📂Vue Diary. Contribute to skarbgud/vue-diary development by creating an account on GitHub.
github.com
'javascript > Vue' 카테고리의 다른 글
| Vue devtools 설치 및 사용 (0) | 2021.07.25 |
|---|---|
| Vue.js 컴포넌트 (심화) (0) | 2021.04.13 |
| Vue.js 컴포넌트 (기본) (0) | 2021.03.20 |
